Fabrication of a Custom Access Door Frame: Day 1

Here is what I am working on this afternoon. A customer needs a door fabricated to fit on this pre-made 12" round fitting. So, after a bit of drawing and thought, I came up with an idea for a frame that I can fabricate separately and bolt on. Today was the day to build the shell of the door frame and map out where to cut the hole on the pre-made 12" round Y-fitting.

Here is the pre-made fitting that
I will attach a door frame and door. The frame will be 12" wide by 14" tall and will wrap around the back side of the fitting.

Below is the template that I have cut for the top and bottom side of the door frame. I have left 2" of material  so that I can bend a 3/4" flange that will run along the inside of the frame. This is so the door that I fabricate later will have something to sit against when closed.

By the magic of pictures, the flat template has been bent into what will become the top and bottom of my frame. I will need two total of these and two total of  what will be the sides of the frame. Those are just basic flat templates with the same bend and flanges. I made an executive decision and left those pictures out.

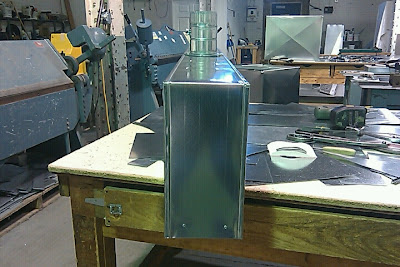
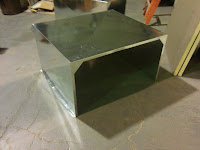
Below is the finished frame which I will attach to the pre-made 12" Y-fitting that was shown above. This is only the frame, I will later need to make a door that will fit inside and sit on the 3/4" flanges around the inside of the fitting. All of the fabrication was done with bends and Pittsburgh joints. We do not weld anything at our shop. (except for stick pins used for insulating duct)

Now that the frame is complete, I will place it on the pre-made fitting so I can get my measurements for cutting a hole in the 12" Y-fitting. The hole on the fitting will end up being roughly 10" wide by 12" tall. See photo below.

Starting tomorrow I will cut the hole and start to attach the door frame to the 12" round fitting. This actual job order doesn't need to be completed for a few days, so I am working on it in between other orders that need to be finished first.

These are the types of projects that break up the monotony of fabricating stock duct fittings and trunk duct. I will have another post to show the next few steps in a few days.

Check us out at: www.kesheetmetal.com

Enhanced by Zemanta

Fabrication of Custom Exhaust Hood For Screen Printing Shop

Even though duct work is our bread and butter and what the majority of my work day consists of. We often get projects that are along the same lines, but just different enough that some extra thought and attention is needed. Case and point, the project I had for the last few days has been to fabricate an exhaust hood for a drying machine inside a small screen printing shop. I won't even pretend to know exactly what the machine does, the customer drew up what he wanted and I am making it to those specifications. Simple. Here's some pics.

Below is the wide shot of the hood. The customer wanted a rectangular box with pieces angled inside that would deflect the air to the center 4" collar.There are no welds, everything is done with the Pittsburgh machine, break, hammer and rivets.

This picture just gives a clearer view of the depth of the piece and a look at the collar in the center. The total dimensions were 62" wide, 6" deep and 12" in height with a 4" collar cut into the top middle.

Here is a shot looking inside at the angled pieces that will deflect the air toward the center of the hood.  It's tough to see, but I also added a 1/4" 90 degree lip around the bottom edge for some stability. Even though the hood is for a smaller application, the width of the hood will make it weaker in the middle and prone to bowing or popping. The angle will give it just enough strength to keep it stable when the machine is running and keep any noise to a minimum.

Enhanced by Zemanta

End of The Week Pin Action

One of my most hated tasks in this business is insulating duct work. I know that it is a necessity for some applications and obviously, more work means a bigger invoice. However, it is one of the most tedious of the jobs that I have and can eat up hours quickly, leaving me little time for other work. I know that it comes with the territory though and for the first time this year I have a full day of pinning and insulating. Any business is good business.

Filter Rack Installation Inside a Plenum

This morning I am working on a custom cold air filter box. Basically a plenum with a filter rack riveted inside. I fabricated the plenum and just finished installing the filter rack. Here are a few basic before and after pictures.

 Here are a couple pictures of the finished plenum without the filter rack installed. As you can see, I have left a slot in the plenum ( 1 1/4" wide ) where the filter will slide in and out.

Next I have to fabricate the 1"x1"x1" channel pieces that will become the finished rack inside the plenum. The plenum is a basic 16" x 24", so I will need two 23 3/4" rails for the long sides and one 15 3/4" rail for the short side. Notice I have subtracted 1/4" from each rail. That is so the rails fit easily inside the plenum without any unneeded force, while allowing for movement in the plenum for easy installation on the job site. I have also cut some 45 degree notches on the 15 3/4" rail so that when the filter slides inside, it won't get caught on a bent corner of metal.

All that is left to do is rivet the sections of rail inside the plenum and the rack is installed. I usually start by installing the 23 1/4" sections first and then slide the 15 3/4" section down inside the other two rails. Now the customer can pick it up and install it on the job site. I have used some basic filter material in the picture to show how the filter would slide inside the plenum. I would not suggest using this as a filter for a homeowner. Buy some high quality filters that will last.

A Full Day Of Custom Fabrication

Thought that I would post a couple pictures of what I worked on today. It isn't everyday that I get to make all custom fittings. Most days are filled with stock duct and maybe a few easy custom things. I enjoy a day that sees a custom fitting go from mind to metal.

The top photos are of a custom condenser cover. They are very basic because the customer wanted something less expensive. The bottom photos are a custom U-shaped elbow for running the duct under a support beam. The customer didn't want to fool around with cutting and fitting stock elbows on the job.

Receivables, Receivables, Receivables

The frustration for any micro or small business is being paid. This is our current dilemma. The slowdown in business has made us tighten on everything from driving less to not eating out with family. I feel like this would be the case for any company we deal with, if in the same dilemma. Not true.

Being a micro-business can be very tough when customers don't pay their bills. We can't afford to get a court involved and our receivables aren't large enough to pay fees for a receivables loan or something similar. You can send letters and make phone calls until your blue in the face, but you will always get the same answer...the check is in the mail. 
Our business is very small and we count on every dollar....literally! We will track down a single dollar if necessary. We as a company continue to pay our bills. We cut costs and use credit cards if possible, but we always pay or we call our vendors and are honest. They will usually be very forgiving and take whatever we can give at the time. We rarely get this courtesy. 
It can be frustrating on many levels. You provide a needed service that isn't compensated. Chasing money is not our business. Our business is metal fabrication. We fabricate, you pay...that's the deal.